How to Annotate Screenshots for Clear Instructions on Mac
Use click markers, arrows, shapes, text, crop, and blur to make instructional screenshots clear without covering important context.
This screenshot annotation guide shows how to mark software screenshots for instructions. You will identify one point of attention, crop or frame the screen, choose the right annotation, protect private details, and test the result at its final reading size.
TL;DR: Use one primary annotation per screenshot, keep the interface label visible, and put the full instruction beside the image instead of covering the screen with text.
Start with one point of attention
Each instructional screenshot should answer one visual question. The reader may need to know where to click, which value to choose, what changed, or which warning to notice.
Write that question before editing the image. If the screenshot must explain three unrelated controls, split the step or capture a more focused state.
Crop before adding annotations
Cropping removes irrelevant space and makes the target easier to find. Keep the application name, section heading, nearby label, or other context the reader needs to confirm they are on the correct screen.
A weak crop either shows the entire desktop or cuts so tightly that the control loses its location. A stronger crop keeps the target and one useful layer of surrounding interface.
Action Focus can provide a similar result without changing the underlying screenshot. Use it when you want to frame the relevant area while preserving the captured page for later adjustment.
Choose the annotation by its job
The annotation type should match the uncertainty it removes. Use this table before adding several marks to the same image.
| Annotation | Use it for | Avoid it when |
|---|---|---|
| Click marker | Exact pointer or tap location | The target is a large region or no click occurs |
| Arrow | Direction or a connection from text to a control | A marker already identifies the exact click |
| Shape | A field, group, warning, or changed area | The border would cover labels or several controls |
| Text | A short value, warning, or condition | The full instruction belongs beside the image |
| Framing or Action Focus | Removing distraction and improving scale | The reader would lose necessary navigation context |
| Blur | Protecting information that must not be shared | Safe test data can be used at capture time |
One primary annotation is usually enough. A click marker plus an arrow aimed at the same button repeats the same message.
Use click markers for exact actions
A click marker works best when the reader must select one precise point. Place it on the active part of the control without covering the entire label.
Action Capture marks the recorded click automatically. Review the marker after capture because menus, hover states, animation, or a fast interface transition can affect which screen is most useful for the final step.
Additional click markers are useful when one page summarizes several actions, but a step-by-step guide is often clearer when each required action has its own page. In Shotomatic, additional marker tools are available with Pro.
Use arrows and shapes for context
Arrows connect a note to a target or direct attention through open space. Start the arrow away from important text and end it near the control instead of placing the arrowhead on top of the label.
Shapes define an area rather than a point. Use a rectangle or ellipse for a group of settings, a changed panel, or a result that the reader must compare.
Keep color and line weight consistent across the guide. One accent color for actions and one neutral treatment for context is easier to learn than a new visual style on every page.
Keep text short and outside the target
On-image text should be a label, value, or warning that remains useful when separated from the surrounding paragraph. Place it in empty space and connect it with an arrow only when the relationship is not obvious.
Compare these versions:
Before: "You need to click this button here so that the export process can start."
After: "Select Export PDF."
The full step can then explain the checkpoint: "A save dialog opens." This separation keeps the screenshot readable and the instruction accessible to readers who cannot see the image clearly.
Blur only what must be hidden
Blur protects a detail while preserving the surrounding interface. Apply it to names, messages, tokens, customer records, and notification previews that could identify a person or account.
Do not use a light blur for highly sensitive text if the original could still be inferred. Replace the source with test data whenever possible, or cover the detail completely using a method appropriate to the sensitivity and distribution. For the full privacy decision process, see How to Redact Sensitive Information from Tutorial Screenshots.
Compare the screenshot before and after
A useful before-and-after test asks whether each mark has a separate job. The first image relies on the automatic click marker. The edited version adds an arrow toward the next area to inspect and a rectangle around the region whose state matters.
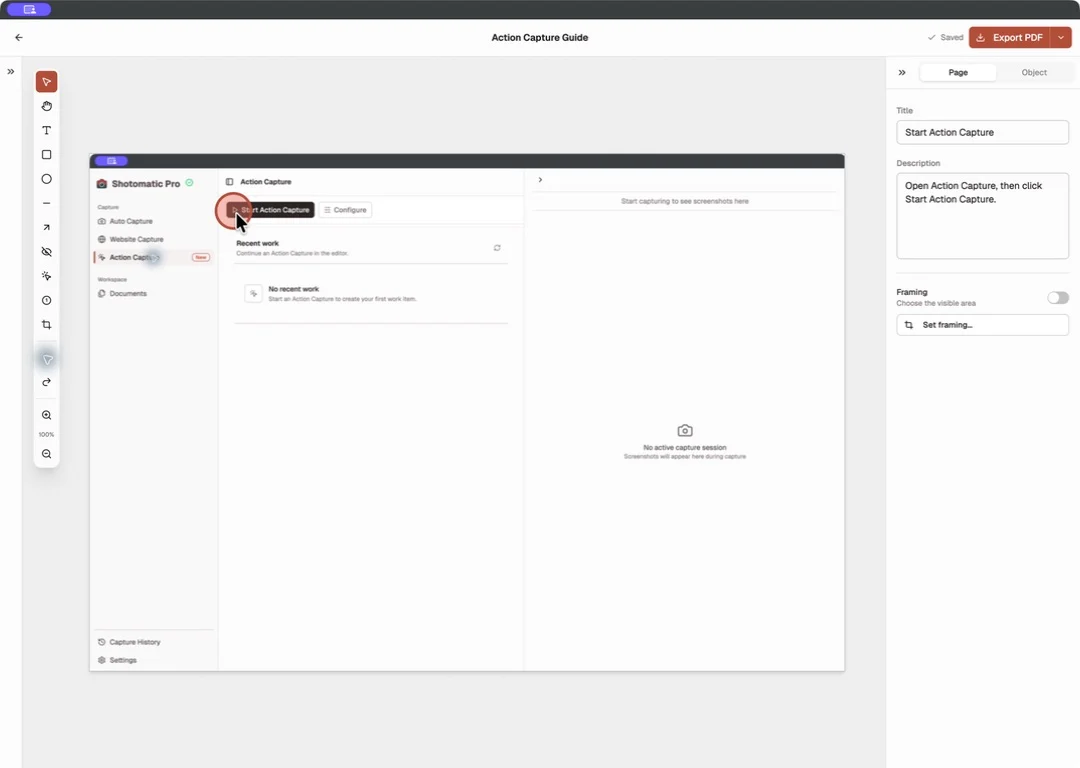
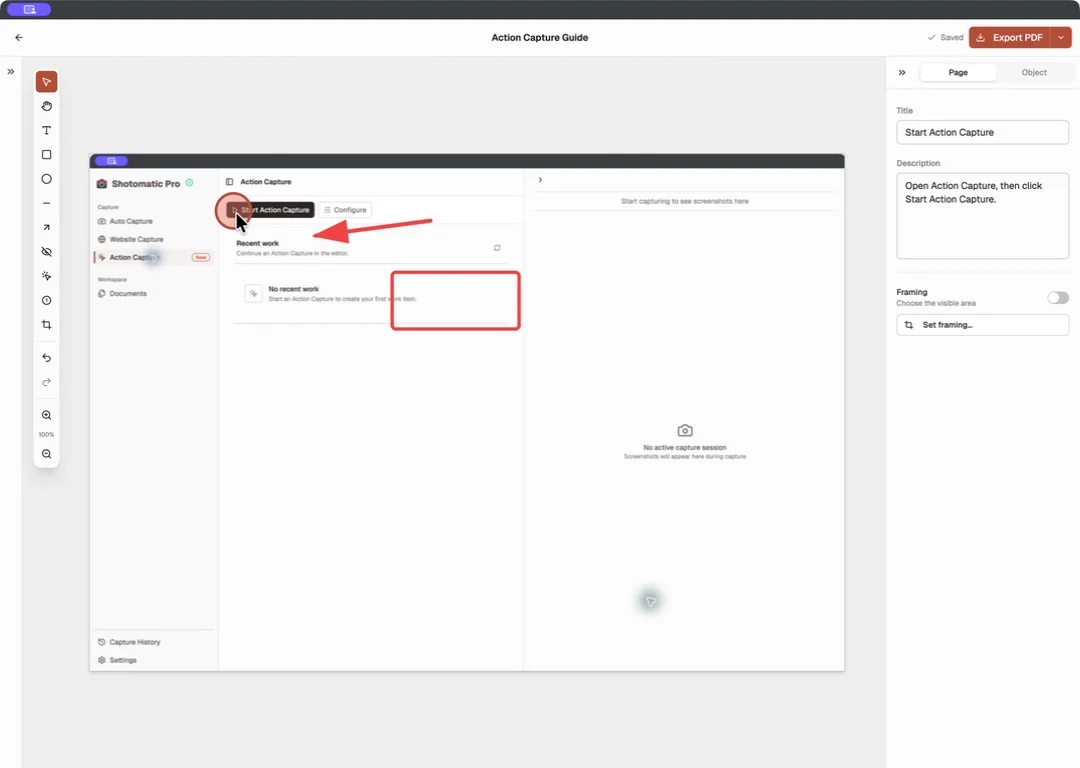
Do not add both marks when the click marker already explains the whole step. This example uses them to demonstrate distinct annotation jobs, not as a default treatment for every page.
Check the final reading size
The final preview catches annotations that worked only while zoomed in. Test the screenshot at the width used in the help center, PDF, or support message.
The screenshot is ready when the application area is recognizable, the target label remains readable, the primary mark is visible, no annotation covers the result, and private information is protected. For the complete capture and page-editing sequence, use How to Create a Step-by-Step Guide from Clicks on Mac. See Action Capture for the current capture and annotation tools.
Frequently Asked Questions
Related posts
See more postsHow to Create a Step-by-Step Guide from Clicks on Mac
Create a step-by-step guide on Mac by capturing meaningful clicks, marking each action, editing the steps, and exporting images or a PDF.
How to Write Clear Step-by-Step Instructions for Software
Write software instructions with one action per step, exact interface labels, visible checkpoints, useful screenshots, and concise error routes.

How to Redact Sensitive Information from Tutorial Screenshots
Remove sensitive information from tutorial screenshots by choosing safe test data, crop, blur, or complete removal for each risk.
Local vs Cloud Process Documentation Tools
Choose a local or cloud process documentation tool based on capture, storage, privacy, collaboration, offline access, sharing, and administration.
Turn your clicks into a clear step-by-step guide
Action Capture records each click as an ordered step, then lets you edit and export the guide on your Mac.