How to Document a Product Walkthrough with Automated Screenshots on Mac
Create product walkthrough documents automatically using timed screenshot capture on Mac. Click through your product while Shotomatic captures every screen, then export as a PDF walkthrough.
Product documentation is often out of date. Not because teams don't care, but because the update process is painful. You need to click through every screen, take a screenshot manually, paste it into a document, resize it, add a caption, and repeat forty times. The product ships a UI change, and the whole process starts over.
There is a faster way: set up timed screenshot capture, click through the product at a steady pace, and let the tool capture every screen automatically. Export as PDF. Done.
TL;DR: Set a 3-5 second capture interval, click through your product naturally, and Shotomatic captures every screen state. Export as a searchable PDF — instant walkthrough document without manual screenshotting.
Why Product Walkthroughs Still Matter
Every product team knows they should have walkthroughs. Customer support references them. New hires learn from them. Sales uses them in demos. Compliance requires them.
But walkthroughs are expensive to create manually. A 30-screen walkthrough means 30 individual Cmd+Shift+4 captures, 30 drag-and-drop operations into a document, 30 alignment adjustments. An hour of tedious work for a document that becomes stale the next time the UI changes.
The result: most teams either skip walkthroughs entirely, maintain outdated ones, or rely on video recordings that are hard to reference and impossible to search.
The case for screenshots over video
Video walkthroughs (Loom, screen recordings) are easy to create but hard to use:
- Can't search. Looking for the settings screen? You need to scrub through the video.
- Can't reference. "See step 7 in the walkthrough" is specific. "See around 2:34 in the video" is vague.
- Can't print. Some compliance and training workflows require printed documentation.
- Can't embed in wikis easily. Most documentation platforms handle images better than video.
- Become stale silently. A video with one outdated screen looks current until someone watches the whole thing.
Screenshot-based walkthroughs are documents. They're searchable, referenceable, printable, and easy to update by replacing individual screenshots. They work in Notion, Confluence, Google Docs, and plain PDFs.
The Automated Walkthrough Method
The core idea is simple: instead of manually capturing each screen, you set a timer and click through the product naturally. The tool captures a screenshot every few seconds. You end up with a sequence of screenshots covering every screen you visited.
Step 1: Plan the flow
Before you start capturing, know where you're going. Write a quick outline:
- Login screen
- Dashboard (default view)
- Click "New Project"
- Project creation form
- Fill in project name, click "Create"
- Project detail page
- Settings tab
- Team members section
- Invite modal
- Confirmation
This doesn't need to be formal — a sticky note or a text file works. The point is to avoid wandering during the capture session. Backtracking creates duplicate and confusing frames.
Step 2: Prepare the environment
Before capturing:
- Use a clean test account. Avoid capturing real customer data, personal information, or sensitive content.
- Close notifications. Disable Do Not Disturb or close notification-heavy apps. Even with window capture, system overlays can appear on top.
- Set your browser to a consistent width. If documenting a web app, use a standard viewport width (1280px or 1440px). This keeps screenshots consistent across sessions.
- Log in first. Don't waste captures on the login flow unless that's what you're documenting.
- Clear any banners or modals. Dismiss cookie banners, promotional modals, or "what's new" popups before starting.
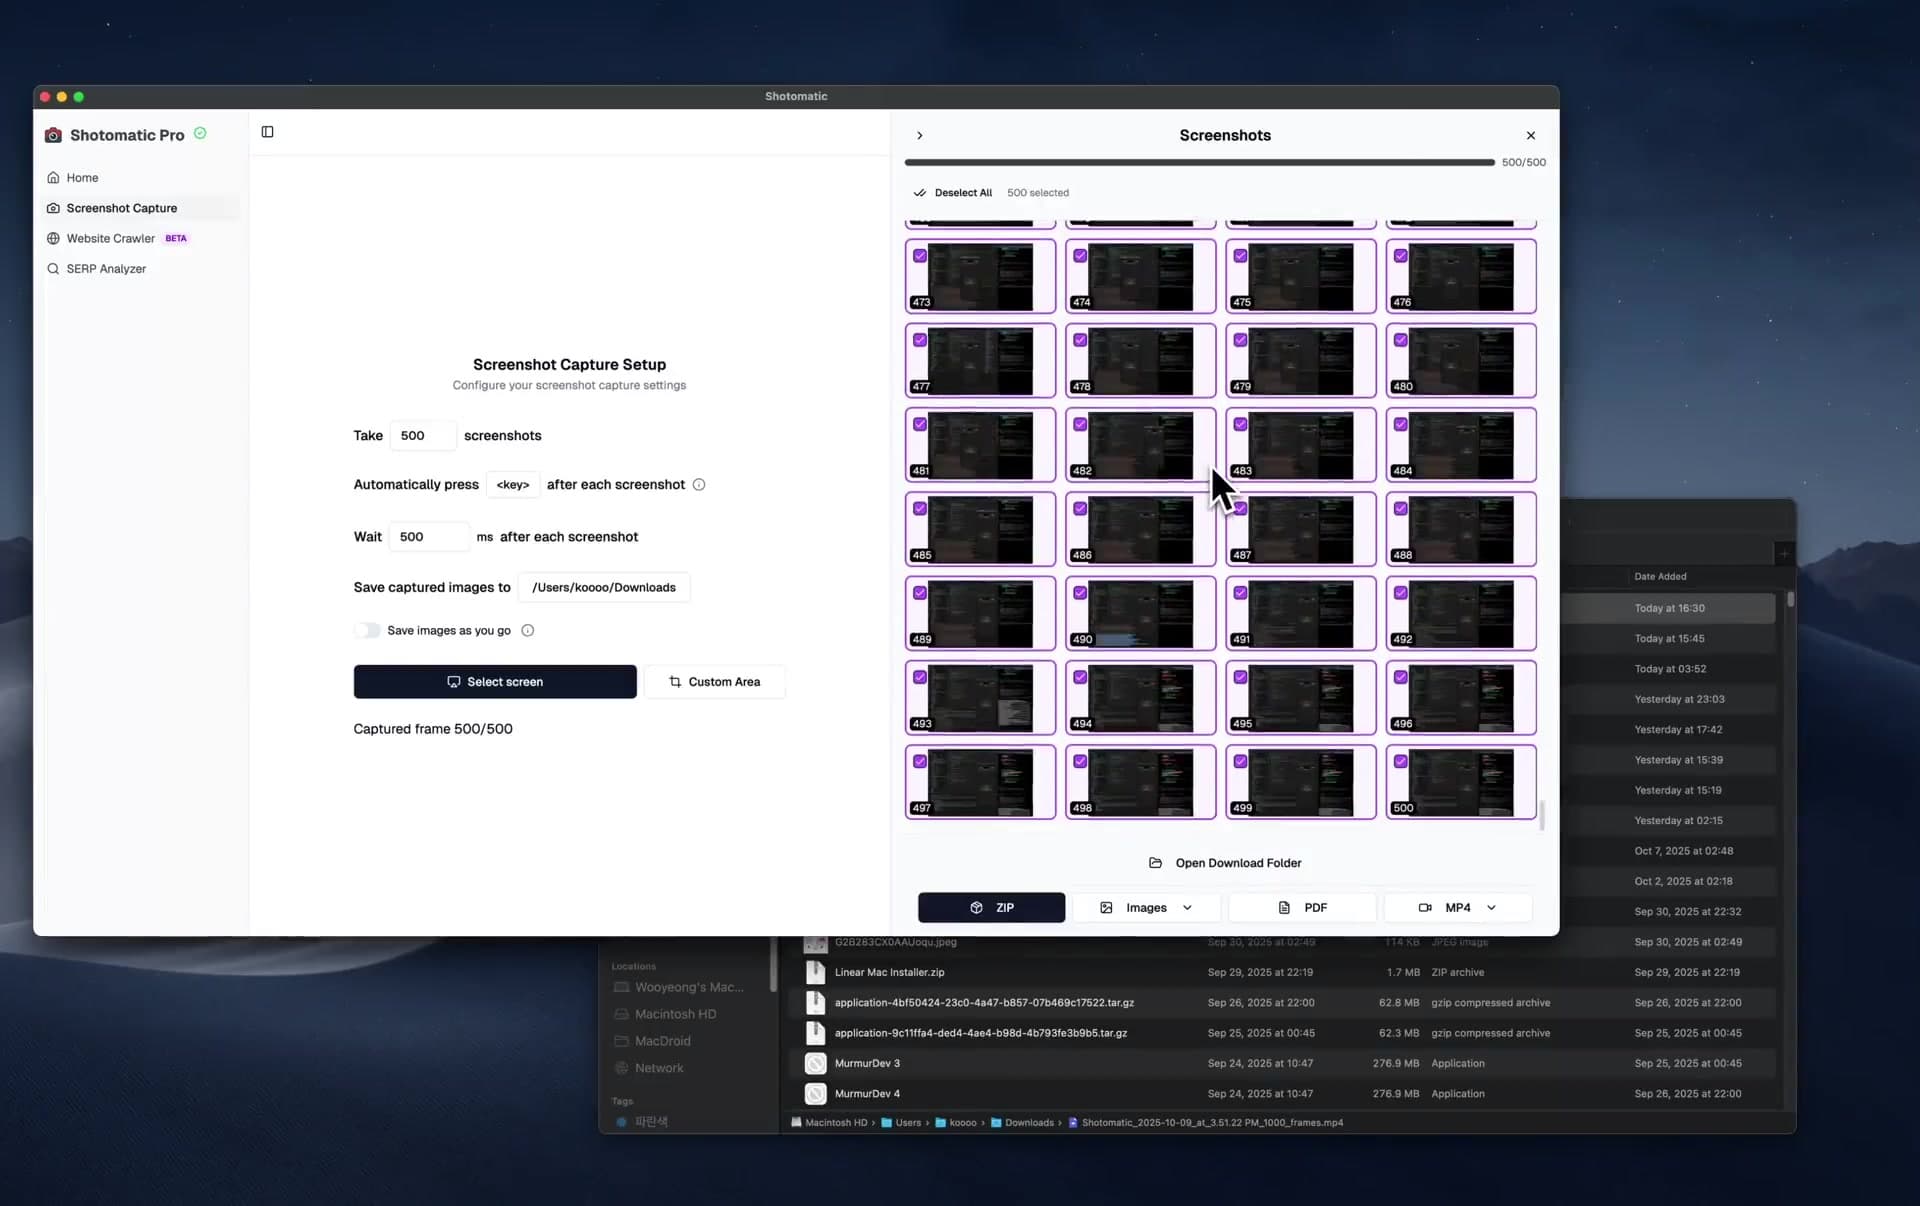
Step 3: Configure the capture
Open Shotomatic and set up:
- Capture mode: Window capture, targeting your product's window (browser tab or native app)
- Interval: 3-5 seconds
The interval is the key decision. At 3 seconds, you need to click and wait quickly — the screen needs to fully load before the next capture. At 5 seconds, you have breathing room. If your product has loading spinners or animations, use 5-7 seconds.
For most web applications, 4 seconds is the sweet spot.
Step 4: Click through naturally
Start the capture and begin navigating your product. The rhythm is:
- Click the next element (button, link, tab)
- Wait for the screen to load completely
- Pause for a beat (let the capture fire)
- Click the next element
Don't rush. If you move too fast, you'll get captures of half-loaded screens or transition states. It's better to move slightly slower and get clean frames than to rush and need to redo the session.
What about form fills? If your walkthrough includes filling out forms, type at a normal pace. The capture will fire during typing, producing some in-progress frames. That's fine — you'll remove them during review. The important frame is the one showing the completed form before submission.
What about dropdowns and modals? Open the dropdown or modal, then pause. The next capture will grab it in its open state. Then close it or make your selection. This ensures transient UI elements are captured.
Step 5: Review and curate
After stopping the capture, you'll have more frames than you need. A 5-minute clickthrough at 4-second intervals produces about 75 screenshots. Your walkthrough probably needs 25-40.
Review the frames and remove:
- Duplicate captures of the same screen (you'll get 2-3 of each if you paused)
- Loading states and spinner frames
- Partially typed form fields
- Transition animations caught mid-frame
- Accidental captures of wrong screens
Keep one clean, fully loaded screenshot per meaningful state. The order is already correct because the captures are sequential.
Step 6: Export as PDF
Export the curated set as PDF. Each screenshot becomes a page in the document. Shotomatic adds OCR during PDF export, which makes button labels, menu items, and other visible text searchable in the finished file.
The result is a product walkthrough document. One screenshot per page, in order, searchable, ready to share.
Making the Walkthrough Useful
A PDF of screenshots is a starting point. Here's how to turn it into genuinely useful documentation.
Add context externally
Since Shotomatic captures screenshots without annotation, you have two options for adding context:
Option A: Annotate in Preview or another tool. Open the PDF in macOS Preview and use the markup tools to add arrows, circles, or text callouts highlighting key UI elements. This works well for internal documentation where visual callouts are enough.
Option B: Embed screenshots in a document with surrounding text. Import the individual screenshots (export as PNG instead of PDF) into Notion, Confluence, or Google Docs. Add step numbers, descriptions, and context around each image. This produces the richest walkthrough but takes more time.
For quick internal docs, the raw PDF is often sufficient. For customer-facing documentation, Option B is worth the extra effort.
Organize by user flow
Don't create one massive 100-page walkthrough. Break it into focused flows:
- Getting started / onboarding
- Creating a [core object]
- Managing team members
- Settings and configuration
- Billing and subscription
Each flow becomes its own PDF or document section. This makes updates easier — when the settings UI changes, you only redo that section.
Version your walkthroughs
Include the date and product version in the filename: walkthrough-project-creation-v2.4-2026-03-22.pdf. When the UI changes, create a new capture session and export a new version. Keep the old one archived for reference.
Walkthrough Use Cases
Customer onboarding docs
The scenario: New customers sign up and need to learn the product.
The workflow:
- Create a clean demo account with realistic sample data
- Capture the key onboarding flow — signup, initial setup, first core action
- Export as PDF or individual PNGs
- Embed in your docs site with step-by-step text
Update cadence: Re-capture after any major UI change. With automated capture, this takes 10 minutes instead of an hour.
Internal training materials
The scenario: New team members need to learn internal tools — admin panels, CMS, deployment dashboards.
The workflow:
- Click through the tool as a new user would
- Capture every screen and important state
- Export as PDF
- Share in the onboarding wiki
Internal tools change less frequently than customer-facing products, so these walkthroughs stay current longer.
Compliance and audit documentation
The scenario: Your compliance team needs evidence that certain processes exist and that the software supports required workflows.
The workflow:
- Document the specific workflow the auditor cares about (e.g., "how data is exported," "how permissions are managed")
- Capture each screen in the flow
- Export as PDF
- Store in your compliance documentation repository
The OCR-searchable PDF is particularly useful here — auditors can search for specific terms without reading every page.
If this use case matches what you are building, the two core pages are screenshot automation on Mac for the capture loop and save screenshots as PDFs on Mac for the handoff-ready document workflow.
Sales enablement
The scenario: Sales reps need to show prospects specific features without doing a live demo every time.
The workflow:
- Capture the product's best features and most impressive screens
- Export as a polished PDF
- Sales attaches it to follow-up emails: "Here's a walkthrough of the reporting dashboard we discussed"
This works as a leave-behind after calls and gives prospects something tangible to share with their team internally.
Common Pitfalls
Moving too fast
The most common mistake. If you click faster than your interval, you'll miss screens entirely. Slow down. A 5-minute capture session produces a walkthrough that would take 45 minutes to create manually. There's no rush.
Forgetting to clean up the environment
Capturing a walkthrough with a messy test account — old data, error states, half-completed items — produces screenshots that don't represent the product well. Spend 5 minutes cleaning up the test account before capturing.
Trying to capture everything in one session
A complete product walkthrough might cover 20 different flows. Don't try to capture them all in one continuous session. Break it into separate sessions — one per flow. This keeps each session focused and makes it easier to redo individual sections when the product changes.
Using too short an interval
At 1-2 second intervals, you'll capture every micro-state — every hover effect, every loading spinner, every half-rendered frame. This creates more work during the review step. For walkthroughs, 3-5 seconds is better than 1-2 seconds.
Walkthrough Maintenance
The hardest part of product documentation is keeping it current. Automated capture makes the initial creation fast, but you still need a process for updates.
Track UI changes. Set a calendar reminder to re-capture walkthroughs quarterly, or tie it to major releases. Some teams add "update walkthrough screenshots" to their release checklist.
Keep source files. Save the Shotomatic session alongside the exported PDF. If you need to recapture a single section, you can reference the original frames to understand what was covered.
Assign ownership. Every walkthrough should have an owner — usually the PM or technical writer for that feature area. Without ownership, walkthroughs drift out of date and eventually get deleted.
Getting Started
Pick one user flow — the one customers or new hires ask about most. Set a 4-second interval, click through it, and export the PDF. The whole process takes about 10 minutes, and you'll have a walkthrough document that would have taken an hour to create manually.
Once you have one, the second is easier. You already know the rhythm — click, pause, click, pause. Before long, you have a complete set of walkthroughs covering every major flow in your product.
Shotomatic has a free trial with limited captures, and paid plans for unlimited use. Everything runs locally on your Mac.
Related posts
See more postsHow to Create a Timelapse of Your Screen on Mac (2026)
Three ways to create screen timelapses on Mac — from timed screenshots to OBS. Step-by-step guide using Shotomatic's interval capture and MP4 export for workflow documentation, bug evidence, and async updates.
How to Automate Website Screenshots Without Code
Choose a no-code way to automate website screenshots: URL-list capture, an automation platform with a screenshot API, monitoring tools, or browser helpers.

How to Automate Website Screenshots with Playwright
Use Playwright to automate website screenshots with JavaScript. Capture one page, full pages, mobile views, and URL batches with retries.

How to Automate Website Screenshots with Puppeteer
Use Puppeteer to automate website screenshots with JavaScript. Capture one page, full-page screenshots, URL batches, and mobile viewports with a reusable script.

Ready to automate your screenshots?
Archive books, capture content, and save hours of manual work.