How to Create a Timelapse of Your Screen on Mac (2026)
Three ways to create screen timelapses on Mac — from timed screenshots to OBS. Step-by-step guide using Shotomatic's interval capture and MP4 export for workflow documentation, bug evidence, and async updates.
You want to show a long work session without making someone scrub through a full recording. Screen recording can do it, but for many Mac documentation workflows there is a better fit.
TL;DR: Capture timed screenshots at intervals, then export as MP4. The result is often lighter and easier to review than a full recording. Shotomatic does this natively; you can also DIY with
screencapture+ FFmpeg.
Why Timelapse Often Works Better
Screen recording captures everything — every frame, every pause, every detour. For long async updates or workflow recaps, that is often more detail than the reviewer needs.
File size. Screen recording encodes video continuously, so long sessions usually end up much larger than timelapses built from interval screenshots.
Less dead time in the output. Screen recordings include every moment you spent reading docs, waiting for a build, or stepping away. Timelapses compress long sessions into checkpoints, which often makes the final video easier to skim.
Easier review before export. With a screen recording, trimming usually means opening a video editor. With screenshot-based timelapses, you can review captured frames and export only the selected set.
Privacy review. Screen recordings capture everything — Slack messages, email notifications, password prompts, personal browsing. Timelapse screenshots are easier to review frame by frame before export, which makes it simpler to leave sensitive moments out.
3 Ways to Create Screen Timelapses on Mac
Method 1: Shotomatic (Recommended)
Shotomatic is a macOS app built for automated screenshot workflows. For timelapses, the process is straightforward: set an interval, capture, export MP4.
How it works:
- Set your capture interval (e.g., every 5 seconds)
- Choose window or screen capture
- Hit Start — work normally while it captures
- Review frames and export the selected set
- Export → MP4
Pros:
- Native MP4 export — no external tools needed
- GUI frame review before export
- Window targeting for app-focused capture
- Presets for common workflows
- Optional countdown timer before capture starts
Cons:
- Mac-only
- Paid app (free trial available)
- No audio capture (it's a timelapse, not a recording)
Best for: Mac users who want the fastest GUI path for bug evidence, internal updates, tutorials, or workflow documentation.
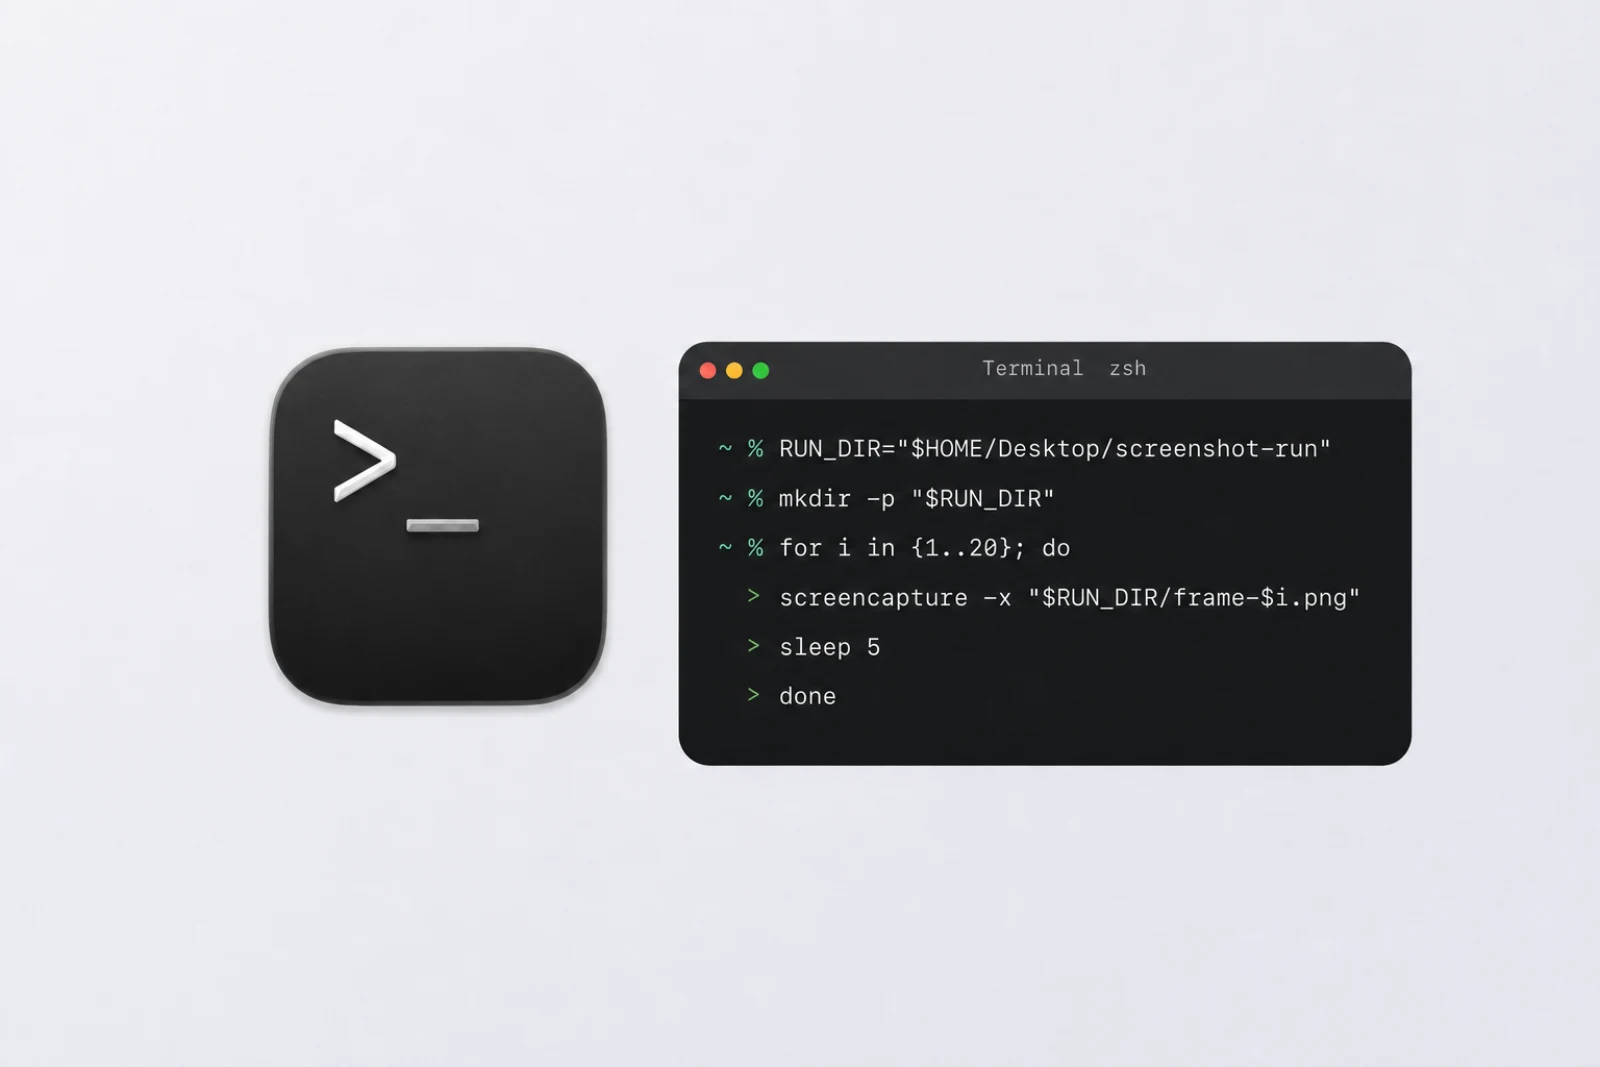
Method 2: macOS screencapture + FFmpeg
The free, manual approach. macOS has a built-in screencapture CLI command, and FFmpeg can stitch images into video.
The script:
#!/bin/bash
# Capture a screenshot every 5 seconds
mkdir -p ~/timelapse
i=0
while true; do
  screencapture -x ~/timelapse/frame_$(printf "%05d" $i).png
  i=$((i + 1))
  sleep 5
done
Stop the script with Ctrl+C, then stitch with FFmpeg:
ffmpeg -framerate 30 -i ~/timelapse/frame_%05d.png \
  -c:v libx264 -pix_fmt yuv420p timelapse.mp4
Pros:
- Completely free
- Full control over every parameter
- No third-party app needed
Cons:
- Requires terminal comfort
- No GUI for frame review — manual file handling
screencapturecaptures the full screen (no window targeting without extra scripting)- No preview before export
- Two-step process (capture, then stitch)
- Easy to forget to stop the script
Best for: Developers comfortable with the terminal who want a free, flexible capture pipeline.
Method 3: OBS Studio
OBS Studio is a free, open-source screen recording tool. It does not create screenshot timelapses directly — you record at full speed and speed up the footage later in a video editor.
How it works:
- Set up a screen or window capture source in OBS
- Record at full resolution
- Import the recording into a video editor (iMovie, DaVinci Resolve, etc.)
- Speed up the footage 10-60x
Pros:
- Free and open-source
- Can include audio if needed
- Powerful recording options (multiple sources, overlays)
- Cross-platform
Cons:
- Usually produces much larger files than interval screenshots
- Requires a separate video editor to create the timelapse effect
- Multi-step workflow: record → edit → export
- Better for recording than for lightweight recap workflows
- Usually higher system load during capture
Best for: Users who already have an OBS + video editor workflow, or who need audio or exact playback in the final output.
Comparison Table
| Feature | Shotomatic | screencapture + FFmpeg | OBS Studio |
|---|---|---|---|
| Cost | Free trial / Paid | Free | Free |
| Setup time | Fastest GUI setup | Terminal setup required | Recording setup + editing |
| Terminal required | No | Yes | No |
| Native MP4 export | Yes | Via FFmpeg | Via video editor |
| Frame review | Yes (GUI review) | Manual file handling | Video editor scrubbing |
| Window targeting | Yes | Extra scripting | Yes |
| File size | Usually smaller | Usually smaller | Usually larger |
| Audio capture | No | No | Yes |
| Post-processing needed | Minimal | FFmpeg command | Video editor |
Step-by-Step: Create a Timelapse with Shotomatic
1. Set Your Capture Interval
Open Shotomatic and configure the interval. This controls how often a screenshot is taken.
Recommended intervals:
- Quick demo/tutorial: 1-3 seconds (smooth, detailed playback)
- Design or coding work: 5-10 seconds (good balance of detail and file size)
- All-day documentation: 30-60 seconds (compact, high-level overview)
For a first attempt, start with 5 seconds. You can always adjust after seeing the result.
2. Choose Your Capture Mode
Window capture focuses on a single application — your code editor, design tool, or browser. It is usually the cleaner choice when you want the timelapse centered on one app instead of your whole desktop.
Screen capture grabs your entire display. Good for showing multi-app workflows but captures everything visible, including notifications and the dock.
For most documentation-oriented timelapses, window capture is the better choice. It usually produces a cleaner, more focused result.
3. Start the Capture Session
Click Start. Shotomatic begins capturing at your configured interval. An optional countdown gives you a few seconds to switch to your target app.
Now just work normally. Shotomatic runs in the background.
Tips during capture:
- Avoid dragging windows over your target app (if using window capture, this doesn't matter)
- Dismiss notifications that pop up — or better, enable Focus mode on macOS
- If you need to take a break, stop the capture and restart when you're back
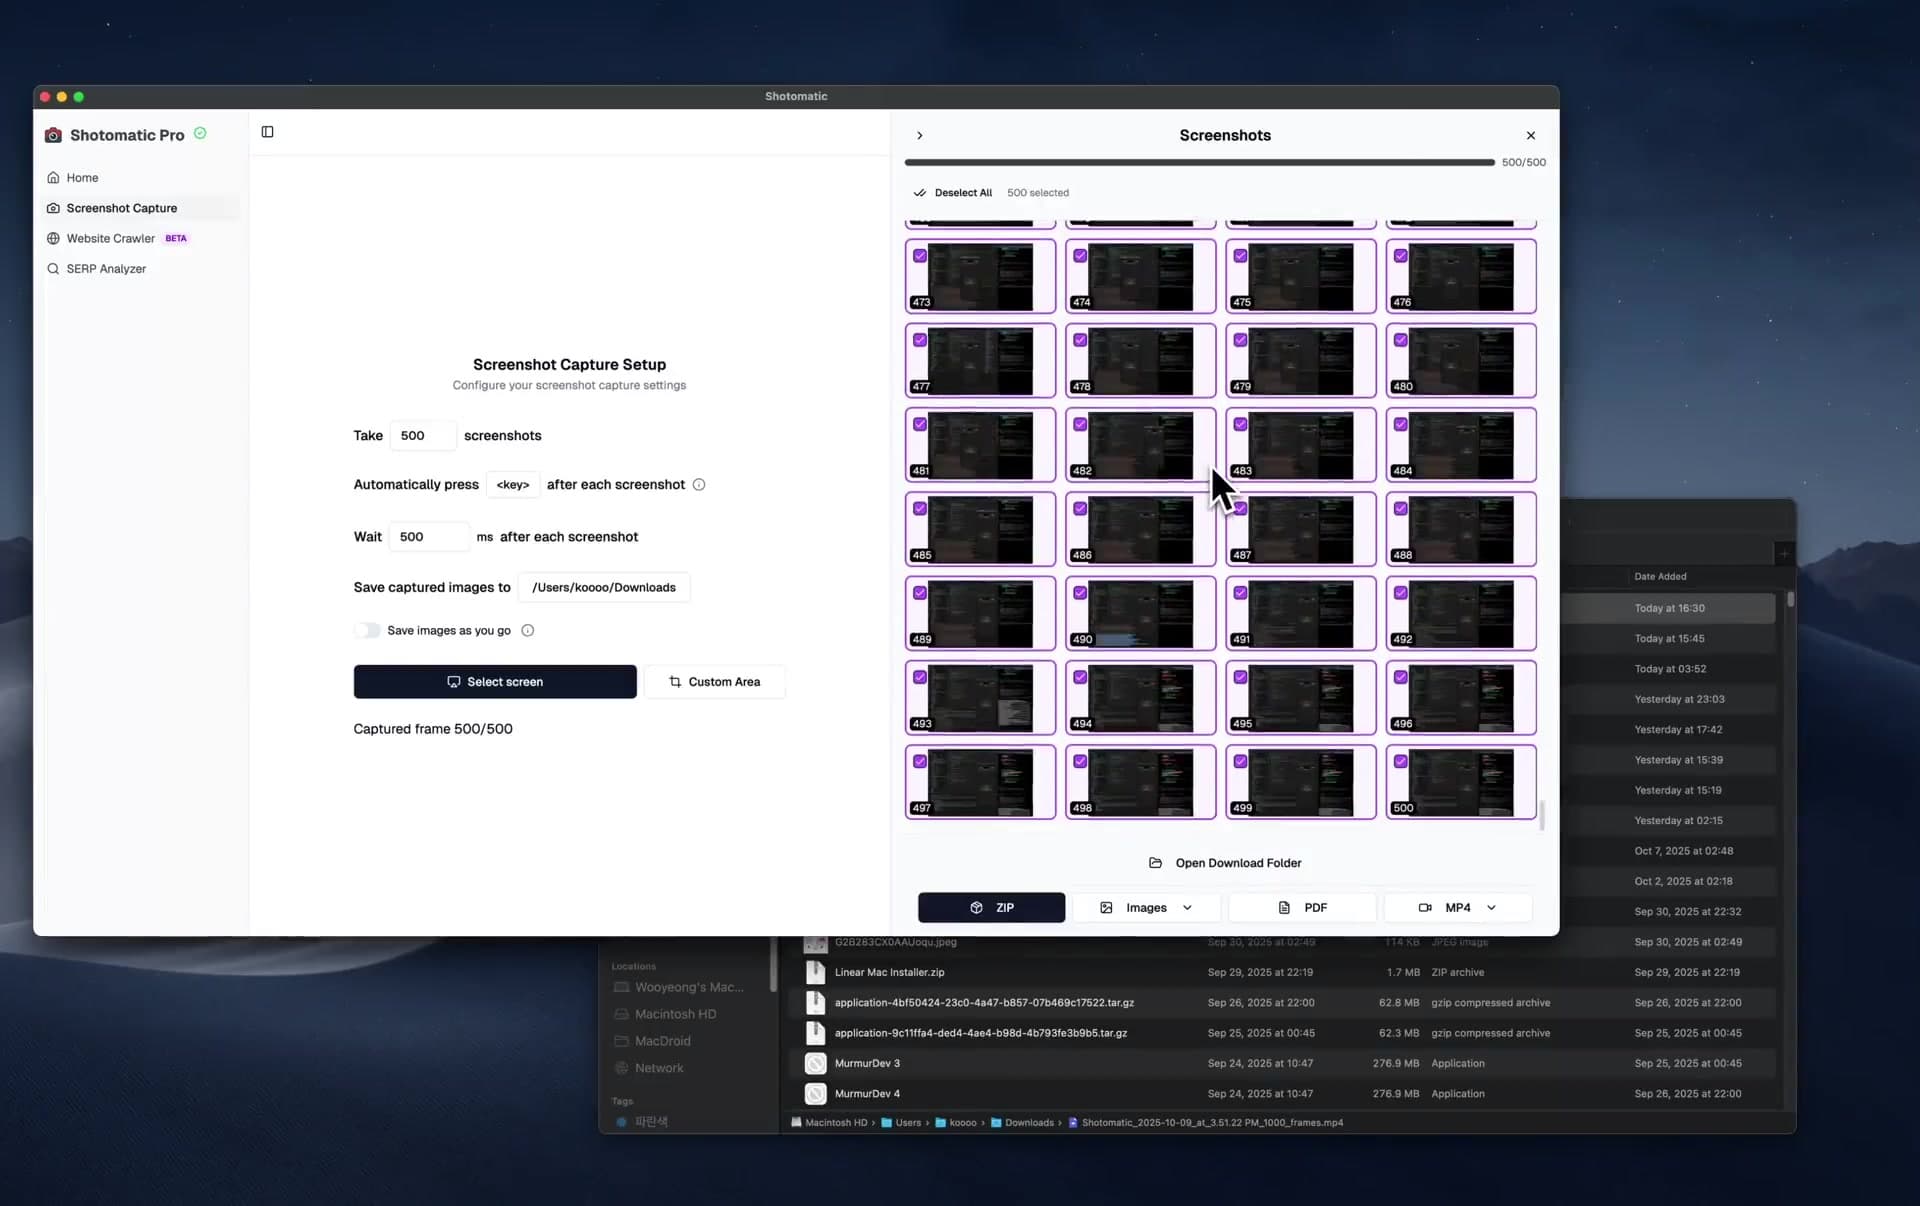
4. Review Frames Before Export
After stopping the capture, review your screenshots in Shotomatic's gallery. Each frame is a thumbnail you can quickly scan.
Leave these out of the export if they appear:
- Password prompts or login screens
- Slack messages or email notifications
- Personal browsing
- Long idle periods (if you forgot to pause)
This step is one of the biggest advantages over screen recording — you can inspect the captured frames individually before exporting the final timelapse.
5. Export as MP4
Select Export → MP4. Shotomatic stitches your screenshots into a video.
The exported MP4 is ready to share in docs, tickets, internal updates, or client recaps. No video editor needed for the basic workflow.
Best Interval Settings by Use Case
| Use Case | Interval | ~Frames/Hour | Result |
|---|---|---|---|
| Quick demo / tutorial | 1-3 seconds | 1,200-3,600 | Smooth, detailed playback |
| Design work (Figma, Sketch) | 5-10 seconds | 360-720 | Good visual progress coverage |
| Coding session | 5-10 seconds | 360-720 | Good detail without excess frames |
| All-day work documentation | 30-60 seconds | 60-120 | Compact daily summary |
| Dashboard monitoring | 60+ seconds | 60 or less | Periodic snapshots |
Rule of thumb: If changes happen fast (drawing, rapid coding), use shorter intervals. If changes are gradual (writing, reading docs), use longer intervals.
Use Cases
Internal updates and standups. Replace "I worked on the login flow" with a short recap that shows what changed.
QA evidence and bug recaps. Show the overall flow of a long repro or test session when the reviewer needs the recap, not exact second-by-second playback.
Tutorial creation. Show the process of building or fixing something without forcing the viewer through a normal-speed recording. Add voiceover later if needed.
Client progress updates. Give stakeholders a fast visual recap when they need to see direction and progress rather than exact timing.
Workflow documentation. Capture long coding, design, or review sessions as a recap that is easier to store and revisit than a full recording.
FAQ
What's the difference between a screen timelapse and a screen recording?
A screen recording captures every frame continuously, producing much larger files and a full real-time playback. A screen timelapse captures screenshots at intervals and stitches them into a short video. The result is usually lighter and easier to skim, but it is a sampled recap rather than a complete playback.
How much disk space does a screen timelapse use compared to screen recording?
Usually much less, because a timelapse captures periodic screenshots instead of encoding video continuously. The exact difference depends on your resolution, interval, export settings, and how long the session runs.
What capture interval should I use for a screen timelapse?
It depends on the activity. For coding or design work, 5-10 seconds captures enough detail. For all-day documentation, 30-60 seconds keeps file sizes small. For quick demos or tutorials, 1-3 seconds provides smooth playback.
Can I create a screen timelapse for free on Mac?
Yes. You can use the macOS built-in screencapture command with a shell script and FFmpeg to stitch frames into a video. Shotomatic provides a GUI-based workflow; check the current plan details before choosing a route.
Does a screen timelapse capture audio?
No. Since timelapses are built from screenshots taken at intervals, there's no continuous audio stream to capture. If you need audio, use a screen recording tool like OBS or macOS Screen Recording, then speed up the footage in a video editor.
Related posts
See more postsBest Automated Screenshot Tool for Mac (2026)
Compare how Shotomatic, Snagit, and CleanShot X handle automated screenshots on Mac: repeated captures, website batches, OCR, and timelapses.

How to Save & Archive Kindle Books as PDFs (2026 Guide)
Step-by-step guide to backing up Kindle purchases as searchable PDFs on macOS using automated screenshots. Covers the 2025 USB download removal, 2026 EPUB changes, Calibre alternatives, and legal considerations.

Automate Screenshots on Mac with the Command Line
Use macOS screencapture loops for full-screen, fixed-area, and page-turn screenshots, with safe file names and troubleshooting.
How to Automate Screenshots on Mac with Built-In Tools
Automate screenshots on Mac with screencapture, Automator, or Shortcuts, including permissions, safe loops, and troubleshooting.

Ready to automate your screenshots?
Archive books, capture content, and save hours of manual work.